There is no such thing as the absolute ownership of a work of art... the owner is, at the most, in the position of a life-tenant, with the implied duty of handing on the property to the next tenant in as good or in better condition than it was when it came into his posssession. -- Douglas Cockerell
I've always admired the Hardinge tool room lathes. When I worked in my college instrument shop years ago, the shop forman had a brand new HLV-H that no one else was allowed to touch. When I found out how much it cost, I understood why.
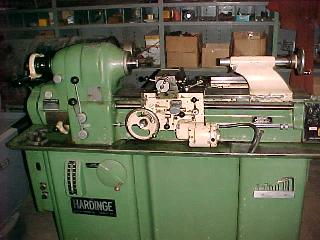
Recently, an artist/craftsman friend of mine pointed me to a sparsely attended sealed bid sale at the local university. He urged me to make a minimal bid on a battered old Hardinge HVL (narrow bed) lathe. I was out of town and all I could see was a picture on the sale web page. The lathe didn't look too good, but I put in a modest bid to see what would happen. Four days later, I got an e-mail telling me I owned the lathe.
When I got home, my friend and I visited the sale site. The machine had been glued together with hospital green paint and dried grease. Details were randomly highlighted with yellow paint applied with what appeared to be a house painting brush. We powered up the lathe. It rattled and bounced around the room. The carriage drive was shot. Somewhat discouraged, I went home and hired a truck.
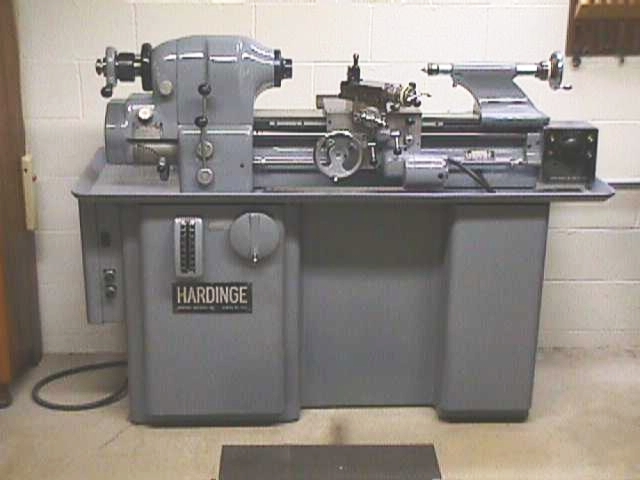
The university folks were very helpful and gathered up collets and attachments from all over the building to go with the lathe. They also loaded the lathe onto the truck with their forklift. I took the lathe to an industrial painter who cleaned it up, masked up all the unpaintable surfaces and sprayed it with light gray enamel. (At this point, I still thought I might "get off lightly" and be able to use the machine after a little cleaning and adjusting.)
With the machine set up in my garage, I was ready make some trial cuts:
I put a 15" length of 1" stress-proof steel in a collet, faced off each end and drilled center holes. Next I mounted the live center. I used a tool post grinder to finish the center perfectly. I cleaned the tailstock center hole carefully and mounted a new live center. With a sharp tool I took several light cuts. The smooth feed and rigid drive make a great finish on the bar despite the sharp pointed tool. I was excited to mike the bar!
Grief.
Not only was the bar tapered smaller at the tailstock end by 0.006, it got fatter in the middle by 0.002". I took another cut at the headstock end, reversed the bar and made another cut with the same diameter on the other end. Now the bar ends were the same diameter. I put the bar back between centers and measured the offset of the tailstock. It was deflected 0.003". I took off the gib pads under the tailstock and found 0.003 shims on each. Joy! Some idiot must have put them in... Another trial cut showed both ends to be correct, but the center was still fat.
I removed the carriage gib and found that it was shaped like a twisted pretzel. I left the gib out and measured the distance from the carriage edge to the edge of the dovetail. I made a table of these distances for one inch movements of the carriage all along the bed, holding the carriage against the rear dovetail by hand.
There was less than 0.001" of variation all along the bed on both edges. Near the working zone, the error was never more than 0.0005. How could the bar be so far off?
Inspecting the top surface of the way showed the problem. The rear edge still had grinding marks while the front edge was polished smooth. Using a long parallel and a dial test indicator, I measured the peak wear at 0.001. This was allowing the front edge of the carriage to dip down, pivoting on the supported back edge. The tool was pulled away from the bar by 0.0025 (because of the height of the tool) making the diameter grow by 0.005. This leaves about 0.001 of diameter change unaccounted for...
Time to grind the lathe dovetail!
At this point, I made a large decision: To remove the dovetail required disassembling most of the machine. I was not totally happy with the paint job and I had found evidence of many other worn or impossible-to-clean parts. I decided to totally disassemble the machine, replace all defective parts and repaint everything. Most of the gooped up fasteners, pins and bearings were replaced as well.
During the disassembly, I discovered that the lathe ways had been reground before. The previous rebuilder had removed 0.006 from the top of both way segments. (A small section is hidden under the left edge of the headstock.) A 0.006 shim was added under both sections. The 0.003 shims were added to the tailstock pads to compensate for the inward shift. This, however, was not the correct compensation. The tailstock shims should have been 0.0034. The missing 0.0004 added the extra 0.0008 to the taper.
During the next few weeks I found and fixed dozens of minor defects. Packages from Hardinge seemed to arrive every other day with springs, pins, screws, name plates & etc. Except for the collet closer throwout bearing, I found it best to buy ball bearings and seals from a local dealer who had everything required in stock. At last count, I have found 24 ball/roller bearings in the machine. A few were still in good condition.
The parts guy "Dave" at Hardinge was unbelievably patient. I had an old parts list with incomplete numbers. He looked up all the current cross references to the HLVH and checked out which parts would work on the older "BK" series machines. So far I've placed four long tedious orders, mostly for inexpensive parts. I expect he earns more during the time he handles my order than Hardinge makes on the parts.
The HLV User's Manual
HLV Parts List and Assembly Drawings
Rebuilding the carriage motor and worm gear
Available parts
Disassembly procedure
Assembly procedure
Alignment procedure
Links & credits