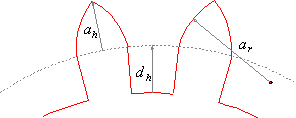
Figure 1: Parts of a wheel tooth.
Hugh Sparks
April 26, 2013
http://www.csparks.com
Watches and clocks traditionally use cycloidal gearing. This page will show you how to design these gears and the cutters used to make them. The focus will be on the design described in British Standard 978 Part 2: Cycloidal Type Gears. This is equivalent, I believe, to Swiss standard NHS 26702.
Horological gearing is a big subject but there is very little practical information for people who want to make their own gears and cutters. Old books on watch repair have doubtful rules of thumb. Many books on theoretical horology explain cycloids but have no practical equations. The international standards are usually published as big tables of numbers with no explanation of how the values are obtained.
The formulas presented on this page were derived by the author. They have been used to compute tables that agree with the values published in B.S. 978, so I have every reason to believe they will work for gearing not covered by the tables. As far as I know, the material presented here is unavailable anywhere else on line or in print.
Dr. Rainer Hessmer has created an application that makes beautiful drawings of gears using these equations. You can read about his work and download the program here: Cycloidal Gear Builder
Modern machinery uses involute gearing. Standard cutters, machines and finished gears can be ordered from catalogs. In contrast, finished cycloidal wheels and pinions are nearly impossible to buy. So our first question will be Why use cycloidal gearing at all?
This issue is somewhat controversial, but there seem to be three reasons:
Most clock repairers have seen the consequences of well-intended sprays of WD-40 on clock movements. The owner manages to get the clock running again for a few weeks, but then everything ends up stuck together. If the treatment is repeated, the teeth eventually get worn away by the grit captured when the lubricant starts to dry out. I've seen this damage in old clocks: the steel pinions end up with grooves cut where the wheel meshes. The brass wheel teeth end up with concave divots on their acting surfaces.
The ideal for most gearing is to have conjugate action. This means that when a a gear rotates at a constant angular velocity, the mating gear also rotates at a constant velocity. The velocity ratio is the same as the gear ratio.
It turns out that given nearly any reasonable curve for a tooth, a mating tooth can be designed that will give conjugate action. The reason for having different gear tooth design rules is to satisfy other conditions such as lower friction, ease of manufacture, or tolerance of errors.
Cycloidal gearing requires two different curves to obtain conjugate action. Take two disks that we want to mesh as gear by adding teeth. Introduce a third rolling disk which will be used to generate the tooth profile. Make the rolling disk roll along the outer edge of one of the gear wheels. Let the initial point of contact between the rolling disk and the gear wheel remain fixed to the edge of the rolling disk. The curve traced out from the initial point of contact is called an epicycloid. Using the same roller on the inside edge of the other gear will generate another curve in the same way. This curve is called a hypocycloid. These two curves will be conjugate to each other. The small roller disk is called the generating circle for the gear set.
It turns out that if the generating circle's diameter is equal to the radius of one of the wheels, the hypocycloid will be a straight radial line on that wheel. In the case of watch and clock work, we want the acting part of the pinion leaves to be straight lines. This makes the profile of the space between two pinion leaves a simple wedge-shape. If the generating circle were made larger, the pinion leaves would become undercut curves.
It will be easier to talk about these ideas by introducing some specialized terms for the parts of gears:
Imagine two disks of different diameters rotating against each other without slipping. The outer edge of each disk defines the pitch circle for that disk.
When we put teeth on these disks, the part of the tooth that rises above the pitch circle is called the addendum. In the case of cycloidal gears, the addendum is a curve is an epicycloid . The addendum curve is usually the same on both sides of the gear tooth tip in mirror-image. This is not strictly necessary when a gear train is driven in only one direction. Occasionally the winding wheels of watches are made with wolf teeth. These have an epicycloidal addendum on one side of each tooth tip and a straight or even slightly concave curve on the unused side of the tooth tip. This makes the teeth look like... Teeth!
The tip of the gear tooth must penetrate the pitch circle of the other gear to mesh. We must cut notches in the other gear to clear the tooth tip. The sides of these notches must be conjugate to the addendum curve. These curves form the dedendum of the mating gear. In the case of cycloidal gears, the driven gear is the pinion and the dedendum curves, as explained above, are radial straight lines.
In figure 1, the addendum height ah is the radial distance from the tooth tip down to the pitch circle. The dedendum dh when used to denote a distance, is the depth of the dedendum part of the tooth measured radially from the pitch circle down to the base of the tooth.The addendum radius ar is the radius of a circular arc that approximates the addendum curve. The circular pitch cp (not labeled) is the size of a tooth-space pair measured along the pitch circle. In most gear designs, the width of a space is equal to the width of a tooth.
In a practical gear, some extra bottom clearance must be added to allow for errors in the manufacturing process, depthing errors in the train, and freedom for the wheel pivots. This clearance can be obtained by shortening the wheel addendum, adding depth to the pinion dedendum or a little of both.
The circle that passes through the tips of the teeth defines the outside diameter. This is the diameter of the disk of metal used for the wheel blank.
We must have an integer number of tooth-space pairs on each gear and the size of the tooth-space pairs must be the same along the pitch circle of each gear. The number of teeth in a gear times the circular pitch must equal the circumference of the pitch circle.
When you buy gears or cutters from a catalog, the circular pitch is not used to describe the size of the teeth. That would be too easy. For involute gears, the diametrical pitch is used instead. This is the number of teeth in the gear divided by the pitch diameter in inches. Cycloidal gears are usually metric and the Europeans prefer to work with the reciprocal of diametrical pitch. The diameter of the pitch circle in millimeters divided by the number of teeth is called the module.
The module is used to describe the geometry of a gear in a manner independent of the particular pitch. We might say, for example, that the addendum height used in a certain tooth design is 1.5 modules . To obtain the actual height of the addendum in millimeters for a particular gear, multiply 1.5 times the module. The width of a tooth-space pair is always π modules and the pitch diameter of the gear is equal to the module times the number of teeth. At first this idea seems a little bit abstract, but you need to get used to it. Immediately.
We are going to focus now on a particular system for designing horological gears. British Standard 978 is based on the best Swiss practice and gives good approximations to the theoretical tooth forms. In fact, it is better than the theoretical form because the gears have nice things like clearance and tolerance for pivot freedom and manufacturing errors that would not be present in theoretically perfect teeth.
First of all, B.S. 978 calls for using the arcs of circles instead of true epicycloids as the addendum curves. The circular arcs are chosen to closely match the epicycloidal form. Needless to say, making a circular form tool is easier than generating an epicycloid. Another key dimension provided by the standard is the addendum height for the wheels. This height is chosen to be 95% of the theoretical addendum height. For pinions, the standard calls out extra spacing between small pinion leaves. It also specifies simple addendum shapes for the pinion leaves.
What are addendum curves doing on the pinions you ask? It turns out that when the pinion has ten or more leaves, first contact begins along the line of centers and the contact point slides up and outward along the pinion flank as the gears rotate.
With pinions of less than 10 teeth, the point of first contact occurs before the line of centers and it slides down the pinion flank (towards the center) for a short distance. If the pinion were simply cut off at the pitch circle, the sharp corner would scrape the wheel addendum during the entry action.
For pinions with 10 or more teeth, the pinion addendum will never touch the the wheel. B.S. 978 uses a simple semi-circular arc for the pinion addendum. For pinions with fewer teeth, the standard calls for progressively higher addenda to so the wheel will have something smooth to slide against.
The goal of our calculations will be to find the addendum height of any wheel tooth and the radius of curvature for the addendum of a wheel or pinion. From this information, we can produce cutters as outlined in Wheel and Pinion Cutting.
Now we're getting into the good part! We will use the subscripts w and p on the variables to distinguish between the wheel and pinion. We will also use the subscript g for the generating circle. Definitions:
| nw | Number of wheel teeth |
| np | Number of pinion teeth |
| D | Pitch circle diameter |
| r | Pitch circle radius |
| m | Module |
| cp | Circular pitch |
| R | Gear Ratio |
The gear ratio is defined by:

|
(1) |
All the tooth-space pairs cp must fill the pitch circle:

|
(2) |
From the definition we see that the pitch diameter of the gear is just n in module units:

|
(3) |
And we see that the circular pitch is just π in module units:

|
(4) |
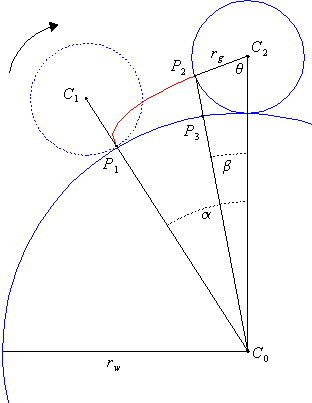
Figure 2 shows the generating circle rolling along the edge of the wheel pitch circle. The addendum curve, shown in red, is traced out as the generating circle rolls clockwise around the pitch circle. This curve is greatly exaggerated here so we can see the parts of the drawing clearly. The addendum curve begins at the point of contact P1 and ends at the top of the tooth tip P2. You are looking at a very stretched-out tooth! We have introduced another variable for the radius of the generating circle. Recall that we want the diameter of the generating circle to equal the pitch radius of the pinion:

|
(5) |
We assume that the teeth and spaces are of equal size, so the width of the tooth is just 1/2 the circular pitch. The distance under the addendum curve along the pitch circle is 1/4 the circular pitch. We will express all angles in radians so we can obtain distances along the pitch circle by simply multiplying the center angles by the radius. Then the angle under the addendum is related to the circular pitch by:
=\frac{cp}{4}")
|
(6) |
Recall that the generating circle radius must be 1/2 the pinion's pitch circle radius: This is the condition for having straight radial pinion addenda:

|
(7) |
So the condition for rolling contact between the generating circle and the pitch circle is:

|
(8) |
Working with these equations and the definitions gives us:

|
(9) |
Consider the triangle C0, C2, P2: Draw a line (not shown) from P2 down to C0,C2 at right angles to C0,C2. Use some trig to see that:

|
(10) |
Which simplifies to:

|
(11) |
So now we have equations 9 and 11 with two variables θ and β . Unfortunately, they cannot be solved algebraically. You have to use numerical methods and a computer. The results are in this web-based calculator. If you want to see how it works, just select view/source from the menu of your browser. The idea is very simple: First guess a value for θ , then use equation 11 to obtain β . Using this β , go back to equation 9 to get a new θ . Just keep doing this until you are satisfied. The results converge rapidly. If you draw a picture of two intersecting curves and place the starting point anywhere along one of them, this process traces out a cobweb-like cycle converging at the intersection.
With theta and beta we can find the addendum height a using the law of sines:

|
(12) |
So:

|
(13) |
Using equation 11 and the previous definitions, this can be simplified by eliminating β:

|
(14) |
Where we have introduced the constant:

|
(15) |
Standard horological nomenclature prefers to express the addendum height in module units. We introduce a new variable called the addendum factor:

|
(16) |
Dividing both sides of equation 13 by m and getting rid of the wheel and pinion radii we have:
")
|
(17) |
I bet you think this part will be even more complex, but it turns out that B.S. 978 uses a simple recipe for the addendum radius factor:

|
(18) |
As you might expect, the actual addendum radius in millimeters is:

|
(19) |
The B.S. 978 value for the addendum height allows for 5% clearance, so the actual addendum height used is:
")
|
(20) |
Most tables for B.S. 978 will show only the practical addendum factor which is already reduced for clearance:

|
(21) |
When using this kind of table, the addendum height in mm is simply:

|
(22) |
Needs an Illustration: TBD. But see figure 1 above.
Most watch and clock gears are quite small, so you will need to introduce a scale factor to make drawings. In the following discussion, the named dimensions should be understood as appropriately scaled values. For making templates to use on a profile projector, you'll want to use a scale factor equal to the magnification of the lens.
To draw a tooth, lay out an arc of the pitch circle big enough to span the tooth.
Draw an arc inside the pitch circle with radius equal to the pitch circle radius minus cp/2. This arc is along the base circle of the wheel.
Draw another arc outside the pitch circle with radius equal to the pitch circle radius plus the calculated addendum height. This arc is along the outside circumference of the wheel.
Space off two points along the pitch circle by cp/2. These points locate the edges of the tooth.
Draw two radial lines from the base circle to the the two points on the pitch circle. These lines are the dedenda of the tooth.
Draw a radial line from the wheel center that bisects the tooth and extends to the outside circumference. That point on the circumference is at the apex of tooth.
To draw the addendum curve, set the compass to the calculated addendum radius and put the center wherever you must to get the arc to pass though the apex and the point where the dedendum ends on the pitch circle. Repeat for the other side of the tooth. If you need a really accurate drawing, it is better to cut out a circular template for the addendum from thin cardboard. Position it so it touches both points and draw along the edge.
The computer can plot the exact epicycloidal profiles of wheel teeth. The idea is to vary θ between zero and the final value. Using this series of θ values, we compute the β values from equation 11 and the intermediate addendum heights from equation 13. This height is added to the wheel radius to get a radial coordinate. Together with β , we have a pair of polar coordinates we can plot. This curve has to be positioned on top of the dedendum notch, which has radial sides.
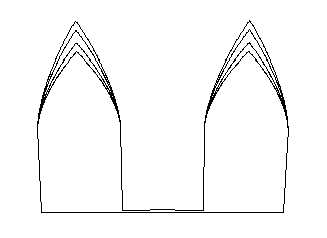
Figure 3 shows four profiles for a 96 tooth wheel. We can see how the shape of the wheel teeth depends on both the ratio and the number of teeth in the pinion. The pinons have 6, 8, 12 and 16 teeth. The highest profile goes with the 16 leaf pinion while the shortest goes with the 6 leaf pinion.
I've had a few requests for the program that makes the plots shown above, so here is the link.
The standard has different proportions for pinions depending on the number of leaves. The idea is to give a little extra space between the teeth and a more pronounced addendum for pinions with fewer leaves. In the following discussion, all dimensions are in modules.
The nominal width of a tooth or a space when they are equally spaced is just pi/2, or about 1.57. For pinions, we will reduce the width of the tooth a bit. For pinions with 6-10 leaves, the tooth width at the pitch circle is 1.05. For pinions with 11 or more teeth the tooth width is 1.25.
The bottom clearance is always 0.4 modules.
So the pinion dedendum (the entire working surface) is:

|
(23) |
Here we use the practical addendum factor of the wheel which is 95% of the theoretical value we computed.
The pinion addendum can have one of three shapes. These curves are not based on any kind of cycloid. The are simply arcs of circles. The arc begins where the dedendum touches the pitch circle and ends at the tip of the pinion leaf.
For pinions with 10 or more teeth, the addendum is a half-circle so the center is in the middle of the leaf on the pitch circle. For other cases, as with wheels, the center is located wherever necessary so the circular arc joins the dedendum and the tip.
The standard gives three addendum height models which can be used with any number of leaves. There are, however, recommended leaf counts for each tip profile:
| Profile | Leaves |
|---|---|
| High ogival | 6 or 7 |
| Medium ogival | 8 or 9 |
| Round top | 10 or more |
After selecting a tip profile, use this table to design the pinion:
| Profile | Leaves | fa | fr |
|---|---|---|---|
| Round | 6-10 | 0.525 | 0.525 |
| Round | 11+ | 0.625 | 0.625 |
| Medium | 6-10 | 0.670 | 0.700 |
| Medium | 11+ | 0.805 | 0.840 |
| High | 6-10 | 0.855 | 1.050 |
| High | 11+ | 1.050 | 1.250 |
The table above, you will notice, shows parameters for all three tip profiles and all counts even though the first table gave recommended profiles. One reason you might want to use a non-recommended profile is for repair work where you're trying to cut a replacement to match some existing design.
Because the tooth profiles depend on the pinion counts, it takes a lot of cutters to have anything like a complete set: Let's assume that you want to repair watches and clocks and would like to have a nice set of wheel cutters on hand. We'll forget about the pinions for now. The shape of the cutter depends on the gear ratio and the number of teeth in the pinions. A reasonable number of ratios might be 14. Pinion counts of 6, 7, 8, 9, 10, 12, 14, 15, 16 are common so we have 126 cutters for each module. B.S. 978 lists 12 preferred modules: 0.1 to 1.0 by tenths plus 0.08, 0.15 and 0.25 so for a set we need 12 of these. Our boxed set contains12 * 126 or 1512 cutters. At about U.S. $70.00 each this comes to 105,840 dollars. Plus tax. Hence my interest in making wheel cutters.
Manufacturers are concerned about the cost and complexity of maintaining large inventories of cutters and steps have been taken many times to evolve simplified systems. W.O. Davis in Gears for Small Mechanisms describes several of these in complete detail. I will simply list them:
Of all these standards, the most modern, E.V.J. looks like a reasonable alternative to B.S. 978 for the individual workman. It was designed at the École d'Horlogerie Vallée de Joux in Le Sentier, Switzerland. It is optimized for cutting wheels and pinions using simple milling cutters. I suspect (but I don't know) that this is the basis for the boxed sets offered by Bergeon and Thornton.
If you are making a single watch and plan to make your own cutters, I see no need for compromise. Using B.S. 978 will reduce friction and eliminate the possibilty of problems using low pinion counts. Standards similar in nature to B.S. 978 are used by the best Swiss watch manufacturers. Why shouldn't you?
If your goal is to make everything from micro watch movements to kitchen clocks, building up a limited inventory using something like E.V.J. might be preferable. If you are making a tower clock, I think it's time to try involute gears.
UPDATE: I visited Sverre Dahl in Moss, Norway. He is a third generation clockmaker, well-known for his large tower clocks as well as beautiful clocks for the home. He makes his own milling cutters and uses cycloid gearing: Sverre Dahl's Tools
This page is very much a work in progress. I will be adding more references, links and and features for the on-line calculator. Stay tuned.
For additional information about watch gears, the following references are accurate and helpful. There are more general watchmaking references at Watchmaking
W.O. Davis, Gears for Small Mechanisms, Tee Publishing reprint, 1993. This is really a must-read if you intend to make gears. He presents charts, diagrams and tables for many horological gear standards.
Jules & Hermann Grossman, Lessons in Horology The Keystone, Philadelphia, 1905. This is by far the best book on theoretical horology I've ever seen.
F.W. Britten & Richard Good, Britten's Watch and Clock Maker's Handbook Dictionary and Guide, 16th Edition, Bloomsbury Books, 1982. Britten contains a copy of B.S. 978 in an appendix.
The definitive Swiss standard is published in the Normes Horlogères Suisses. This opus appears to be available only to the Gnomes of Zurich.
J. Malcolm Wild, Clock Wheel and Pinion Cutting. Arlington Books, 1988. This is only a pamphlet of 46 pages. Wild has recently published a full length book on this topic which I am anxious to read. Update: I just got my copy. See the next entry:
J. Malcolm Wild, Wheel and Pinion Cutting in Horology, Crownwood Press 2001. This is a great book. If you buy only one, this is the one to have. It has all the bibliographic pointers to back issues of Model Engineer I refer to below but forgot to write down.
Claudius Saunier, A Treatise of Modern Horology, Crosby, Lockwood and Company, London 1887. Although primarily of historical interest, Saunier's Treatise has beautiful colored fold-out prints that show the proportions of wheels and pinions as understood in the 19th century. Saunier also presents detailed rules of thumb for designing the "depths."
Claudius Saunier, Watchmaker's Handbook, Crosby, Lockwood and Son, London, 1924. The Handbook is inspiring to study but the methods presented are often easily improved with modern tooling.
Some of the best material on making one-off gear cutters has been published in the U.K hobby magazine Model Engineer. If your library has a set of bound back issues, you will discover many treasures. I hope to add an index to some of my favorite articles Real Soon Now. (tm)
Finally, I would like to mention a privately published monograph by my gear-expert friend, Richard Thoen. This work explains why, in his opinion, cycloidal gearing belongs entirely in the dust-bin of history.
Sadly, I don't know of anything on-line about cycloidal gear design. If you make some gears, please make a web page and send me a note!
The mathematical "typesetting" on this page was created using my little invention JEuler. It lets me (or you) write web pages with LaTeX elements. You can learn more about it here.
There is nothing new under the sun. I've located
a book that demonstrates similar calculations. It is a famous
book and I've wanted a copy for many years, but there was no
reprint and originals were very expensive:
Jules & Hermann Grossman, Lessons in Horology, The Keystone, Philadelphia, 1905, pp. 171-189.
You can now read it for free via
Google Books!