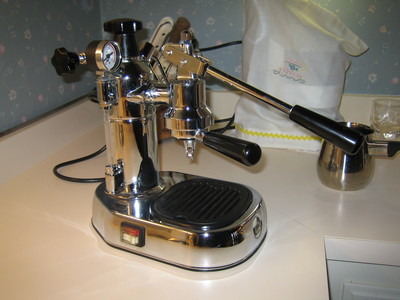
La Pavoni Europiccola
Vacationing in Tuscany, I noticed the breakfast latte was really good. In fact, it was so good, it wrecked the American coffee shop experience for me.
When I got home, I went to Coffee Machine City at the Mega Mall. (Right next to Spatula City.) The saleswoman showed me a number of beautiful and even miraculous espresso machines. Some of them, she explained, wake up at 5am, roast the beans, grind the coffee, and blast out a cup just as you stumble into the kitchen.
But that's not what I wanted.
I asked her, "What's the most aggravating, erratic, expensive, complex, demanding but yet ultimately gratifying espresso machine?"
She looked nervously both ways and asked quietly, "Do you have a girlfriend?"
Then she lead me back to a dark and dusty corner of the shop. There before me was a chrome-plated prop from a '50s science fiction chemistry lab, festooned with pipes and knobs: Just what I had in mind.
So I bought a La Pavoni manual-pull espresso machine and a pile of books.
These are the notes I use to refresh my memory about how to use the Pavoni Europiccola. It is a wild beast (sometimes called the "Chrome Peacock.") But with patience and perseverance, it can make a superior drink.
Chemistry and biology
Andrea Illy and Rinantonio Vani (editors), Espresso Coffee, Academic Press, 1995.
The book is a collection of articles by various authorities, including the great master, Ernesto Illy. It covers the morphology of beans, extraction chemistry, and recommended parameters. It is weak on practical details.
Scott Rao, The Professional Barista's Handbook, Scott Rao, 1995.
This is an eminently practical guide to advanced methods, machine tuning and artistic technique. The book is privately published. You can read more about it and place and order on the author's website.
The excellent website Espresso Parts has a large selection of books and videos aimed at developing skills for professional barista competitions. The Scott Rao book cited above is the least expensive of the titles sold there. I expect I'll try one or more of these as my budget permits.
A basic online coffee glosssary is published by The Coffee Geek
If you live in a city big enough to have one or more high quality coffee shops, try by all means to visit and experience the product. There is no substitute for knowing what is possible and how it should taste. The widespread availablity of espresso made by disaffected teenagers has done much to debase the public taste.
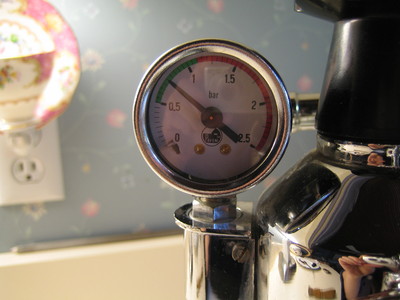
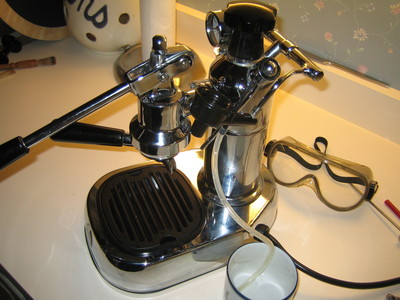
I've been using a slightly modified Pavonni Europiccola. I added the pressure gauge from the "Professional" model.
The Europiccola is a small machine that can only make two or three shots at at time. The large "Professional" model has a larger boiler, but does not allow controlling the temperature setpoint.
If you are truly hard-core, I should add that both of these machines are strictly consumer-grade. Pavoni does make commercial espresso machines, but as far as I know, they are all automatic.
This table summarizes recommendations from the Illy book for a standard double pull:
| Coffee | 13-14 grams |
|---|---|
| Water | 2 - 2.5 oz |
| Water temp | 90.0 (+-5) degrees C (194F +-9) |
| Infusion time | 30.0 (+-5) seconds |
| Infusion pressure | 9.0 (+-2) bar |
The +- ranges are where the art of the barista comes in. Different coffees, different roasts, and personal artistic interpretation all play a role.
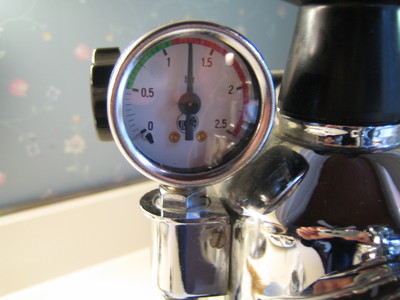
The Pavoni gauge reads pressure in bars. It is only used to determine the temperature. The infusion pressure is determined by your arm.
| At 90C, the equilibrium vapor pressure of water is 0.7 bar. |
|---|
If you want to fuss with other water temperatures, there is a somewhat tedious, but accurate, formula for finding the pressure: the Goff-Gratch equation:
Let t be the temperature in degrees C:
	T  := t + 273.15
	k  := 373.16/T
	a1 :=  7.90298 * (1.0 - k)
	a2 :=  5.02808 * log10(k)
	a3 :=  1.3816e-7 * (1.0 - 10.0^(11.34400 * (1.0-k)))
	a4 := -8.1328e-3 * (1.0 - 10.0^( 3.49149 * (1.0-k)))
	a5 := log10(1013.245)
	s  := a1 + a2 + a3 + a4 + a5
	pressure := (10.0^s)/1000.0
The pressure comes out in bars.
I like to use whole milk, but 2% also works well.
The secret of getting lots of firm froth is using the freshest obtainable product. Trying to froth milk is a good test of freshness.
Buy from a quality high-volume store and check the dates on the cartons at the back of the shelf.
Organic milk
None of the organic co-op milk brands I've tried have worked well. It is possible that they are stale or have other handling that keeps them from frothing well.
In support of the staleness theory, I've found that local organic brands sour in the carton much faster that regular grocery store brands. I don't think preservatives are allowed in any sort of commercial milk, so that only seems to leave the time spent in shipment and storage on the shelf.
In my area, the best milk I've found is from a high-volume high-cost grocery store chain. It happens to be organic, but I've also found that their regular milk works equally well. From this, I think the most likely variable is storage and shipment time before sale.
Milk preparation
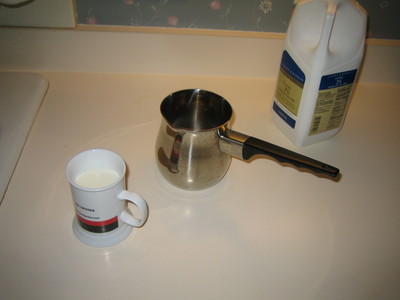
Use stainless steel pitcher that has room for the milk to double in size. If you are making latte with double-pulls, measure out two regular coffee mugs filled 3/4 full. (Two of these are the limit for the Europiccola.)
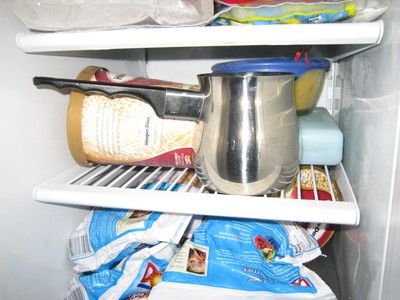
Put the pitcher in the freezer so it has time to chill while you complete the other steps.
You will need two coffee mugs for latte and 2 smaller cups to catch the pulls.
I fill my cups with hot water from the tap and stick them in the microwave for 1 minute.
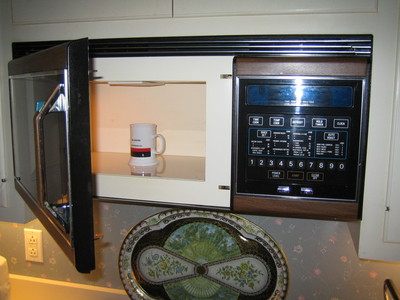
DO NOT repeat the microwave cycle: you can create superheated water that will blow you up when the cup is touched.
The received view is that Coffea Arabica makes the best espresso and most of the more "technical" coffee brands like to state on the package "100% Arabica"
Regular grocery store coffee is a terrible choice. It has too high a percentage of robusto beans, which after extraction often have an aftertaste like burnt rubber.
Freshly ground or not, grocery store beans have usually been on the shelf for weeks after roasting. This is hopeless.
Storing your coffee
It is better if you don't. If at all possible buy small quantities from the roasting shop and grind it immediately before use.
If you must store ground coffee, keep only small amounts in a sealed container. I will confess that I often store a three day supply. It is not optimum, but life is short and mess is long.
Storage should be cool, dry, and dark with no air. Some people store ground coffee or beans in the freezer, but I've had nothing but weird results from that practice. I'm not sure if it's the freezing or thawing that causes damage, but I don't like the taste of the result. Using the refrigerator was a disaster: coffee is a magnet for food odors.
Roast
I prefer to avoid "Espresso roast", "French roast", "Vienna roast", and "Full city roast": These terms are used in a highly inconsistent manner but often refer to beans that are burnt beyond recognition. If you can find a local shop that roasts fresh beans at least weekly, try one of their medium roast arabica blends and adjust to suit your preferences.
A great many coffee house chain store beans I've tried suffer from over roasting. It hides many little coffee faults with one great big one.
Where I live, the grocery store and food co-op substances labeled "Espresso" and sold out of tall plexiglass cylinders share a common characteristic: they are over-roasted and full of peroxidized oils from long-term storage. You'd need to be an old school organic chemist to identify the strange tastes evident in straight pulls from these products. The petro chemical industry might be interested.
Try to locate a roasting shop that does a high volume of business because this helps insure you're getting reasonably fresh beans. Ask them how many sacks of beans they go through a week.
Grind
Whirling propeller grinders give really terrible results because the grain size is not uniform.
If you don't have a good burr grinder, it is better to buy pre-ground or grind it in the store (in small quantities.) Most commercial grinders in stores do a pretty good job of getting uniform grain size, but the grains run a bit large even on the fine setting. I think this is due to the fact that the burrs are seldom cleaned and sharpened or replaced.
The appropriate grind depends on the roast as well. For me, darker roasts need slightly coarser grinds. They also tend to be oily and rapidly gum up the burrs. (You really must take apart your grinder and clean the burrs from time to time.) The pull tells all: If it requires pressure in excess of 23 lbs to complete the pull in 25 seconds, the grind is probably too fine or the tamp is too firm.
A dodge for beginners
Illy pre-ground espresso tastes pretty good to me. I've found I have to tamp extra hard because the grind is a little too coarse for my regular technique. But it's good enough to give the beginner a good idea of what the result should be. Using a reliable product eliminates several variables that can othewise go wrong.
Tamping pressure and grind work together to develop the resistance to the pull. The goal is to subject the coffee to about 9 bars of pressure for 25 seconds.
The Pavoni level gives about 10:1 mechanical advantage. The piston is about 1.5 square inches. Nine bar is 130psi, so dividing by the area:
area = (pi * (1.5/2)^2) = 1.77 in^2
The force at the piston needs to be: 1.77 * 130 = 230 lbs, or 23 lbs at the lever.
When you're working out a new type of coffee, it is best to keep the 23 lbs of force and adjust the grind so this force takes 25 seconds to complete the pull.
If you're using pre-ground coffee, your only control is the tamp. In that case, you have to adjust the tamping force to try and get the same result.
Overfill the portafilter without pressing down at all. If you're using prepared coffee, just take a dip from the can.
Hold the filter loosely in one hand and tap on the side with the back of a knife held in the other hand. The coffee will spill over (use a plate) and settle into the filter. Carry on tapping for about 10 seconds while rotating the filter. You want to end up with just a little to level off with the knife. The tapping integrates the grains and helps prevent blow-outs.
The biggest pitfall here is not having a tamper that fits. The one that comes with the Pavoni is a ridiculous plastic toy with domed ends that are too small to fit the filters. I bought several and none had the close fit I wanted. Finally, I bought an oversized tamper made from an aluminum casting and turned it up on a metal lathe so it fits my filters perfectly. I know this sounds like a big fuss, but it really makes a difference.
I tamp in two phases: First I fit the tamper into the filter and press down with my fingers around the edge holding the whole thing up where I can see that the tamper is level with the top of the filter.
Next, put the filter down on the table and tamp with considerable force, around 40lbs of pressure. I finish with a twist to polish off the top at a reduced pressure.
If all is well, the coffee should be perfectly smooth and level about 3 mm below the top of the filter.
If you put in too much coffee, you won't be able to mount the filter so dump it out and start over. If it's too low, your coffee will be weak and the flow may not be restricted enough to give the right infusion time. You might also get a blowout where the water drill a channel through the cake.
The perfect amount is such that when you tighten the filter into the head, the surface of the coffee rises just enough to reach the bottom of the head filter without rubbing. (If it does rub, you are likely to distrupt the dry coffee enough to make a crack.)
Prepare the machine
Dump old water.
Add fresh carbon-filtered water to just over 3/4 full on the sight glass.
Turn on both switches and open the steam wand valve. When you get steam (not just air) from the wand, close the valve. When you have about 0.5 bar pressure, run a pull through an empty filter to head up the head.
Heating the water
At the moment you start the pull, the water in the the head should be at 90C. The water in the boiler is at 90C when the gauge reads 0.7 bar, but the water temperature in the head will be much cooler when you raise the lever the first time. On the first pull, I let the gauge reach 0.9 bar. Between sucessive pulls, I cool the boiler down by turning off the switch for a few seconds. For the second pull, 0.8 bar is about right. On the 4th pull, the gauge should read read about 0.7 bar. By that time, the head is hot enough to keep the water at 90C. (And you are out of water!)
The water temperature is determined by the pressure as long as conditions are stable. After bleeding off pressure or adjusting the power level switch, you need to wait for the gauge pressure to rise to the setpoint.
Preheating the head
Before the first shot, I run 2 or 3 short pulls though the head. I lock on an empty filter to give a little back pressure. This also insures that the head is quite clean from the last user.
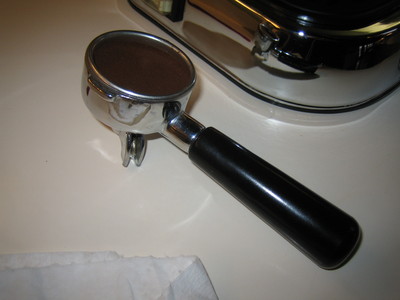
Mounting the filter
Remove the empty filter and dry the bottom surface of the head with a towel. Drips can initiate craters that will blow through.
I like to raise the handle with the filter loosely attached. This lets air fill the cylinder without being pulled back up through the coffee, which could put a crack in the cake.
Mount the filter in the handle and lock it onto head only enough so it doesn't fall out. At the same time, put your preheated catch cup under the head.
Next, raise the handle about 10 degress above level. You want to go as high as possible without releasing water. Unfortunately, the only way to learn about this angle is to scald yourself a few times. If you do release water with the handle unlocked, the pull will be ruined. Actually, there is no need to scald yourself: 10 degrees is enough to insure that you won't pull a vacuum on the coffee.
With the handle held up at this intermediate position, lock the filter all the way. Then raise the handle slowly to the top.
Preinfusion
Preinfusing is the introduction of hot water into the coffee at reduced pressure. The idea is to wet the coffee so it expands in the filter without pushing water all the way through. The coffee will then provide enough resistance when you do the pull.
As soon as you have raised the handle all the way, count off about 3 seconds and press down gently. Just a little more force than the weight of your arm. The head may not have had time to fill with water, so the lever may feel "spongey." Proceed to push down gently until you feel just a bit more resistance. Now wait and watch your catch cup. When drips of coffee begin to fall, release the pressure and raise the lever back up to the top. Now wait for 10 seconds.
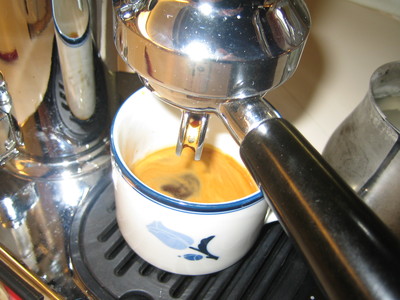
Pulling the shot
Press down with about 20-30lbs of force. I pull up on the filter basket handle to take some strain off the head joint. It should take between 2 and 30 seconds to complete the pull. If you have to press harder or the pull ends up taking longer (or gets stuck!) you probably have too fine a grind. Make adjustments next time.
You might also get a blow-out. In this case, the handle will go down too fast. The stream coming out of the filter will be very light colored "blond" and thee coffee will be undrinkable. If this occurs, dump it and start again.
Watch the stream for color. It should be dark brown with a few lighter streaks. It may occasionally "glop" out looking like honey being poured. All is well as long as the color remains dark. At some point, you may see larger bubbles and a much lighter color. If that occurs, stop the pull at once and withdraw the cup.
When/if you get the lever all the way down, don't wait for the dregs! In fact, some artists like to stop just over half way down, using only the first part of the pull. This is called a "ristretto" and makes very good tasting coffee.
Don't try to release the handle immediately. It will blow you up! Wait for about 20 seconds and partially release the filter, pressing down a bit on the handle to let off pressure. When don't hear any more hissing from the escaped steam, you can remove the filter. I still bungle this from time to time. It makes a colossal mess if you release the filter under pressure.
Take a sip: If it's sour-tasting, you have gone wrong somewhere, probably on the cool side or possibly because a channel formed in the cake. Too long a pull usually at too high a pressure and temperature extracts badness i from the coffee. In that case you will notice organic chemical lab smells and tastes. The crema will be broken up on the surface of the coffee with fractal-looking borders.
Frothing the milk
Some say this is anathema, but I prefer to steam the milk last when making lattes because the machine needs to be roaring hot. You also have more steamng capacity after the pulls are completed because the element is heating a smaller volume of water.. Finally, a latte has so much milk that it pretty much obscures any slight ill effects from the coffee sitting around a few minutes longer.
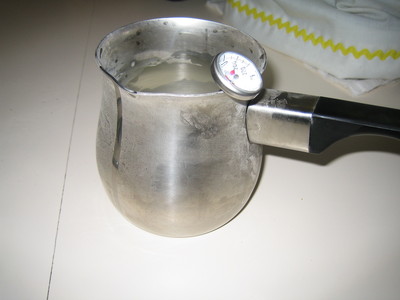
You must have a dip thermometer that features "quick reading." You can buy specialized versions that clip onto the side of your steel pitcher.
Another key factor is the pitcher size: The one illustrated is just right for two regular coffee mugs 3/4 full of milk. It is about half full before steaming and ends up full to the brim with froth. The milk itself is infused with micro-bubbles and has a thick texture when poured.
Heat the machine up to full blast. It will be less than half full after completing two pulls.
Bleed off some steam at the wand to clean out condensation and possible crap.
Dip the wand just below the surface of the milk and open the valve all the way. I keep the wand near the edge of the pitch and tilted slightly to make the milk swirl around.
You want the steam to draw the milk down with the jet, whipping it up into a froth in the process. If the wand is too high, you will blast milk all over the place. If the wand is too low, the milk will get too hot before much froth is generated. It takes just a little practice to get this right. As you proceed, you will have to lower the pitcher because the frothed milk has more volume. Continue this process until the thermometer reads 120F.
Now we begin phase two: we want to head the mild and refine the froth. To do this, lower the wand until you hear a much louder roaring. Then back away until it just begins to quiet down. Raise and lower the pitcher slightly but constantly to adjust the action so you are right at the boundary where the sound changes. (Like the way you dither the steering wheel when driving.) Continue this phase until the thermometer reads 155F.
Don't overheat! When it gets to about 150, get ready to shut off the steam. At 153, start cranking the valve. You have keep the wand in position until it's shut off, so it will go the rest of the way to 155F before you can get the valve shut off completely.
Milk frothing attachment
Pavoni offers a gadget to help you make better froth. I've tried this a few times and I found that it was not as effective as careful work with the wand and fresh milk.
The Pavoni frother is nonetheless useful: Most kitchens have inaccessible areas. Below the sink, corners of the ceiling, backs of seldom-used drawers, etc. If you find that any of these areas in your kitchen are not coated with scalded milk, you may want to give the frothing attachment a try.
Finishing
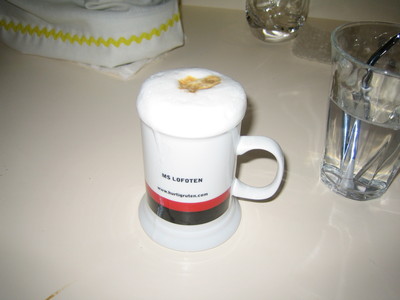
Pour off equal measures of liquid milk into each mug. I use the side of a kitchen knife to hold back the froth. The mug should filled only 2/3 full to leave room for the coffee and frothy topping.
Spoon out the froth to make a head on each cup.
Finally, dump in the coffen from the catch cups. You can finishing by pouring a fine stream into the froth to form decorations: the inverse of a traditional espresso drink where the froth is used to decorate the coffee.
Part of the enjoyment of a latte is the thrill of transgression: Perhaps not as effective as a nose ring or tattoo, but you are drinking a mild-flavored brew that most espresso culturatti disdain. Might as well put some jam on that croissant too.